Microsoft Purview Information Protection, MIP (formerly Azure Information Protection, AIP)
When documents contain sensitive or confidential information, you may use MIP to protect the documents such that only authorized persons can open and read the documents. MIP is applicable to Office documents such as Microsoft Word, Excel, and PowerPoint.
1. Using Microsoft Purview Information Protection (MIP) Labels in Applications
1.1 Microsoft Office 365
For Microsoft Office 365, the sensitivity labels are available in the ribbon bar of Word, Excel, PowerPoint and Outlook.

Image 1 - Sensitivity labels are available in the ribbon bar in Microsoft Office 365 applications.
Please note that you will need to sign in to Microsoft Office applications with your ITSO username and password. Restart the applications if the sensitivity labels are dimmed or not visible.
For Microsoft Office 2016, you need to install the MIP client to enable the MIP features.
1.2 MIP Client
The MIP client (only available to Windows) allows you to apply a sensitivity label to a file by mouse right-clicking it in in Windows File Explorer. Then select “Classify and protect” from the pop-up menu.

Image 2 – The MIP client (Windows only) allows you to apply a sensitivity label to a file by mouse right-clicking to it,
then select "Classify and protect" in Windows File Explorer
Click here to view how to download and install the MIP client application.
1.3 Foxit PDF Editor
The Foxit PDF Editor can connect with Microsoft to enable the MIP features. Please follow the steps below and sign in with your ITSO username and password.
1. Click Sensitivity > Connect to Microsoft Azure Information Protection

2. Enter your email address

3. Enter your password

4. After you received the automatic Push with your Duo Mobile app, "Approve" the sign-in request

5. Review the permission and click Accept if you allow this app to use your data

6. Click Protect Tab, the sensitivity labels are available in the ribbon bar

2. Understanding Label Settings in Microsoft Purview Information Protection (MIP)
2.1 Using HKUST Restricted
The sensitivity label, HKUST Restricted, is used when you wish to protect documents such that only HKUST (CWB) staff members (with email addresses ending with @ust.hk) can open them to read or write. Users other than HKUST (CWB) staff members will not be able open the documents protected by HKUST Restricted. It is a fast and simple way to protect documents for use by HKUST (CWB) staff members.
2.2 Using Highly Confidential
Using the sensitivity label, Highly Confidential, allows you to specify which users can open the document with specific permission.
User Permission
For Microsoft Office 365 users, when you apply the “Highly Confidential” label to a document within Word, Excel or PowerPoint. You may specify the persons to have the Read or Write permission.
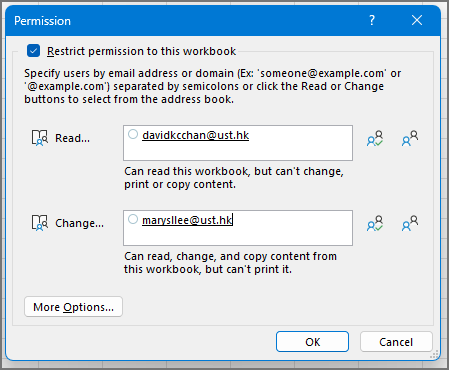
Image 3 – Applying the Highly Confidential label within Microsoft Office 365 Word, Excel or PowerPoint.
For Foxit PDF Editor users, when you apply the “Highly Confidential” label to a document. You may specify the persons to have the Read or Write permission and additional permissions.

Image 4 – Applying the Highly Confidential label in Foxit PDF Editor
With the MIP client (Windows only), there are more options of user permission to choose when you apply the Highly Confidential label to a document.

Image 5 – The MIP client offers more permission options to protect a file when it is used to apply a Highly Confidential label.
With the Highly Confidential label, you need to enter the users' accounts (usually their email addresses, but not email aliases) with which your users use to login to their Microsoft Office applications. They will also need to have a valid Microsoft Office license when the open the protected document.
Notes: In HKUST, all users are using their email accounts (not email aliases) to login to Microsoft Office. However, some external users are not using their email addresses to login to Microsoft Office. You will need to ask your users which Microsoft accounts they are using to login to Microsoft Office before entering their accounts when protecting documents with MIP.
3. Changing or Removing a Sensitivity Label
To change a sensitivity label, you may select another sensitivity label in the “Sensitivity” button from the ribbon bar. To remove the applied label, you select the same label again to remove it.
To change a sensitivity label with the MIP client, you select another label in the MIP client. To remove the applied label, select Delete Label to remove it.

Image 6 - With the MIP client, you may change the label applied to the document by
selecting another one, or remove the applied label by selecting the Delete Label button.
Reference: